Show Posts

This section allows you to view all posts made by this member. Note that you can only see posts made in areas you currently have access to.


Messages - slwelsh

Pages: [1]
1
I have three Kymco windscreens for a Like 200i, but, sadly, I do not have the mounting hardware to actually mount any of them to my 200i -- the hardware, along with yet another windscreen, was firmly attached to my last 200i, which was stolen. I have not bothered to look these up to see if they fit other models.

I've been carrying these around for years, thinking "some day I am going to rig up some kind of mount for my current Like," but the time has come to admit I'm never going to get around to it. Without the hardware they have no real market value, but I'd rather not just bin them.

Two full-height and one shorty. One of the full-height is still in the factory shrink wrap. The other two screens are used and show normal wear including some scuffs, but generally good condition. The two full-height are clear; the shorty is a dark mirrored blue (it's well below your line of sight.)

They're yours for the cost of shipping from Mamaroneck, NY via UPS ground. You can either send me a UPS label, or PayPal me the money and I'll do it. Also, you have to take all three; I have but one box, and I'm not going through this again. If they're not spoken for by the time I leave Mamaroneck this weekend, they are going to the dump.


2
LIKE 200i / Re: LIKE200i rear wheel removal, REVISED
« on: June 12, 2024, 07:16:55 PM »
One of my interests is art forgeries and art theft - so I'd enjoy reading your writings about the theft of your LIKE and People!

Well, since you asked.

My beloved People 150, mint green with chocolate brown handgrips and thus named "Chip," was stolen from a marina in Charelston while I myself was away, deployed by the American Red Cross to St. Thomas for a hurricane relief operation:
https://ourodyssey.blogspot.com/2017/10/grief-and-relief.html

My first Like 200i, purchased to replace the People and involving a long drive in a rental pickup. It was a deep cobalt blue and thus named "Midnight."
https://ourodyssey.blogspot.com/2018/02/first-world-yacht-problems.html

The same guy who stole that bike, by virtue of having absconded with my wife's keyring, returned to steal her Vino 125 a year later, having kept the keys all that time:
https://ourodyssey.blogspot.com/2019/04/purloin-quarters.html

The two Kymcos have never been seen again, police reports notwithstanding. The Vino showed up abandoned at an airport, and we ended up with a towing bill to add insult to injury (it was unsalvageable).


3
LIKE 200i / Re: LIKE200i rear wheel removal, REVISED
« on: June 11, 2024, 03:50:24 AM »
...
Two things:
Are you a writer by trade - before you became a pirate? ...

Two - Neil may just be right that your post will be of great assistance to any owner facing the same issue ...
...
I wondered if you took this on only because you had become becalmed? But no - you have a motor boat.
...

ACF-50 is supposed to help with corrosion on motorbikes and such - but your situation would be a real test!

Digging tires off and back onto rims?.....No way - ...not since I was 12 and I had no other choice! That's why God made dealerships.
...

I am not a writer by trade, apart from incidental to my career in telecom/computers/networking. It's more of an avocation. I write often; we have, for mostly reasons of our own memory and to keep friends and family apprised of our whereabouts and goings-on, a blog that now goes back two decades in some 2,500+ posts, dating to when we left the world of fixed addresses for a nomadic lifestyle. I'm very wordy, so I am not going to suggest you read it. But if you ask me when my last Like 200i was stolen, or the People 150 before that, I will go back to my own blog to get that answer. I could also tell you when and where I last changed a scooter tire (on my wife's Yamaha Vino 125, also since stolen). Or when I discovered that the reason for a slow leak in that tire later was because I had done the change on a grassy area, and a blade of grass was stuck in the bead.

As far as my post helping others, I of course landed on this thread when I was myself searching for any shred of information on this process. So, yes, I do hope Neil is right and anyone in a similar jam will glean something from it.

The reason for taking this on, up to and including wrestling with the tire irons myself, is simple: The logistics of getting the scooter from the boat to a service shop, and then hanging around long enough for them to get to it, and then getting it back aboard, are actually more daunting than just buckling down and doing it myself. The damage happened in the Bahamas, and I discovered it in the middle of Florida, at a time when we could not linger with a hurricane deadline looming.  The Kymco dealer who sold me the tire, reputedly the largest in the nation (Solano Cycles) said three weeks minimum. I'm already in Maryland now -- I could not afford to be just a week north of St. Augustine today.

One of the reasons it took me until yesterday to finish the job is that the same story was playing out with the Honda outboard on our dinghy, which is a far more critical bit of transportation hardware for us, being basically our "family car" if you will. This is the wrong forum, but I made a whole write-up on having to drill out four broken seized bolts from the block after something as simple as needing to replace the thermostat. Here again, at the beginning of summer, outboard shops are backed up a month. Necessity is a mother.

I'll have to look into the ACF-50. I'm using Tef-Gel on hardware as I put it back on (apart from critical torque items like the axle nut and brake bolts), and I have Boeshield as well, but it's a losing battle out here, so I save the spendy chemicals for places where it will do the most good. I though the People 150 and the Yamaha Vino were doing pretty good and still had many years left, even slowly rusting away, but it appears that scooters get stolen before they can age out.

Thanks again for all your help with this; it's great to have this forum as a resource. I don't drop by often (I think my last post was a write-up on putting lamps into the stock turn signal housings), but when I do I always find it helpful.


4
LIKE 200i / Re: LIKE200i rear wheel removal, REVISED
« on: June 10, 2024, 03:49:51 AM »
I thought I'd come back here now that I'm finally done and post an update, in case it might help someone else. I know it's been nearly four weeks, but boat maintenance and getting the heck out of the hurricane box supervened. The new tire finally got installed today, after hours of fighting with the fork bearing.

What I ended up having to do, since no amount of mechanical effort, penetrating oil, or heat would free the bearing, was to resort to an old mechanics' trick:

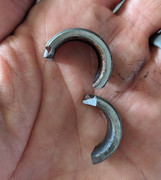
First, I pried the seal off the bearing. This is a rubber-over-metal affair that did not come quietly. That revealed the ball bearings in their "cage," which in this case was metal. The two halves of the cage are spot-welded between each pair of balls. I was hoping those welds would yield to prying, but no such luck. I ended up drilling out every single weld. That let me pry out all the bits of metal cage, and with those out of the way, it's possible to move all the balls to one side of the circle. That lets you worry the two races of the bearing apart.


Now I had the fork off, with the outer race firmly seized inside, and the inner race still seized to the shaft. The inner race was easy: I cut nearly all the way through it with a Dremel in two places, and then I was able to break it in half with a large screwdriver and a four-pound engineer hammer. (A cold chisel is a better choice than a screwdriver but I do not have one aboard.)


The outer race was more problematic. With the fork off I was able to apply plenty of heat and lots of PB Blaster, but it would not budge, especially with no way to get a puller in there. Ultimately I had to again use the Dremel, making several cuts, all on a bias due to the way the tool had to be inserted. A few more blows with the hammer and screwdriver broke it into pieces and I was able to pry those out.


Unfortunately, there was no way to cut deep enough into the race without also getting into some of the aluminum of the bearing housing. Once I cleaned out the housing I put the sanding drum on the Dremel and sanded the gouges out as best I could, in the hopes of rounding any straight lines that could later turn into stress cracks spreading across the casting. It's a beefy casting so I am not too worried.


I put the new bearing (NSK from Amazon, $14 for two) in the freezer for a few hours and I heated the fork casting with my heat gun and it dropped right in. I needed to clean up the shaft with some fine emery cloth, "shoe shine" style, to get it to slide onto the shaft. The rest of the job went smoothly, although anyone who has done it will tell you that it's a bear to get a scooter tire off/on a rim, and to get the tire to bead with just an air compressor. I won't be able to test my work until we are at a dock someplace, which may be a few weeks away.

-Sean

5
LIKE 200i / Re: LIKE200i rear wheel removal, REVISED
« on: May 16, 2024, 02:58:44 AM »
From Kymco tech support...
"Yeah, no more special tricks beyond what you have tried other than combining the methods along with rubber mallet tapping here and there. What will get it done is persistence, just keep trying and it will come loose. If possible you can lean the machine over to help the lubricant get in there, pay attention to the position of the rear fork and work it from multiple angles as it can get bound up."

Persistence.....sometimes the hardest tool to find...

Thank you so much for following up with this.

The whole shebang is still sitting up there on the boat deck untouched, albeit with the new tire supporting the muffler to keep it off the deck paint. After last I posted here, a whole bunch of other things supervened -- we've moved the boat three times since then, and been on a long shopping and mail-retrieval trip aided by serendipitous friends with a car. Normally, the Like would have done the mail-retrieval and shopping duty. Oh, and I had to transit to an Amazon locker to pick up the new bearings, NSK models. By the time I am done with the heat and the, umm, persistence, the one that's in there now will be toast.

-Sean

6
LIKE 200i / Re: LIKE200i rear wheel removal, REVISED
« on: May 16, 2024, 02:52:12 AM »
Nice boat!
If you need any deck hands - I just finished the Pirates of the Caribbean series - and Neil - he must be a sailor, living on an island as he does - has seen Master and Commander twice!
We'll just need to discuss paid leave and health insurance....

So, you are out of Bear, Delaware?

Lol, we get lots of crew offers. It sounds great until you hear the hours and the actual work.

Bear was just a "port of convenience" when we named the boat (a hailing port is a legal requirement for naming a documented vessel). At that point in time we'd already been living several years in an RV and had no fixed home to speak of, and the last place we lived in a fixed dwelling for any length of time was the SF Bay Area. We could have chosen San Jose, CA as our hailing port, but since we bought the boat on the east coast, we figured that would lead to too many "so, did you bring it through the canal?" type questions. Neither of us was partial to any of the places either one of us had lived on the east coast, and so we ended up just picking one. We titled the dinghy out of Delaware for fiscal reasons, and so we just picked Delaware for the big boat, too. "Bear" was the shortest seaport name in the state.

Quote
My daughter wanted to see the Atlantic - and Delaware was a straight shot over - so we went to Lewes, DE last summer. Took the pup. (we won't be going back to Florida until the dog expires....she doesn't now that - I hate putting her in the kennel - the dog, not the daughter)

a question: How do you get the 260lb scooter off of the boat?

There is a davit crane on the boat deck, port side aft, that exists to lower and raise the dinghy. It's an 800-lb crane and we had, at one time, a ~600lb dinghy (we switched from a fiberglass model to an aluminum one, dropping that to ~400). So the scoots are nbd for the crane. We use Canyon Dancer bar restraints to strap them in their deck chocks, and the Canyon Dancer becomes part of the lifting tackle. I replaced the bolts for the rear grab bar with eye bolts for the other end of the harness. Obviously, we have to be at a dock. port-side-to, to offload.

-Sean

7
LIKE 200i / Re: LIKE200i rear wheel removal, REVISED
« on: May 13, 2024, 11:20:17 PM »
That ain't Topeka....where we at here Sean?
Florida,  Bahamas ,  Da Nang?
Nice boat, BTW!

Anchored off the beach at Egg Island, near Spanish Wells in the Bahamas. Taken by another cruiser in the anchorage last month. The flat tire is from a fish hook I picked up riding around Great Harbour Cay. And, thank you. It is our only home.

8
LIKE 200i / Re: LIKE200i rear wheel removal, REVISED
« on: May 13, 2024, 08:33:09 PM »
...
Good luck - would love to see a photo of where your scooters live!


I probably should get a better shot from on deck, but it's raining ATM so you'll have to just zoom in on this one instead. In this shot the Buddy is in front of and partly obscuring the Like.

9
LIKE 200i / Re: LIKE200i rear wheel removal, REVISED
« on: May 13, 2024, 06:10:22 PM »
(Sean - some of us use postimages.org to host and load photos here.)

Darn - "on a boat" ? Saltwater, or ?
...
Heat is obviously cooking the bearing - which - judging by your troubles is already shot. So would be replaced in any event.


Yes, the boat lives mostly in salt water. Which is why this is a used Kymco and not, say, a Vespa on the deck. We actually have two -- the other is a Buddy 125. They're stowed on the boat deck, which is around 10' or so above the water, so they don't see any salt spray, but get plenty of salt air. I'm on my third Kymco in a decade; the first two (People 150 and another Like 200i) were both stolen, so they don't seem to last long enough to rust away.

I've got a new bearing on the way, NSK 6203DDU (seals on both sides, rather than just one). So I'm going to try even more heat, and I guess if that does not work I can pull the cage out of the race, worry the balls out, and get the fork off that way. Then I can cut the inner race off the shaft.

Thanks for your help. Further suggestions from anyone are welcome.

-Sean

10
LIKE 200i / Re: LIKE200i rear wheel removal, REVISED
« on: May 13, 2024, 03:22:12 PM »
... but I think that fork casting is pretty stout! ...

This area of your scooter seems unusually stubborn!
...
I've no other trick for this to release from the axle. Some lubricant, and try every 24 hrs with your puller. Tap tap with the wood.

Thanks for your insight. I went ahead and put a lot more pressure on the puller -- to the point where I am galling the threads of the puller. No luck. Pictured is the current state of affairs. Yes, I know my shocks are rusty. The scooter lives on a boat. That's probably the reason the bearing is seized to the shaft.

-Sean


Hmm. I tried to include a photo but the img tag does not seem to be working.

11
LIKE 200i / Re: LIKE200i rear wheel removal, REVISED
« on: May 13, 2024, 12:51:16 AM »
OK, I know this is an old thread, but it seems the best place to ask:

I'm stuck at the step where the rear fork is supposed to be removed. It appears the inner race is seized to the shaft. I've tried WD40/PB Blaster and heat along with a three-jaw puller. I'm afraid to put more force on the puller because I don't want to break the casting. I see in the notes that Stig needed a 2-jaw puller and I am wondering if that was for this purpose?

Recommendations welcome.

BTW, I did need to use PB Blaster, heat, and a 3/8 air impact wrench to free the axle bolt.

-Sean

12
LIKE 200i / Re: Aux turn signals in the stock housings
« on: February 14, 2019, 03:14:28 AM »
...
I wonder - for us "reading with comprehension" challenged people - do you have more photos of the steps you took to install the lights in the blanked light housings in the LIKE?

Those were all the shots I got during the project. There's really not too much to those little covers; the trick was figuring out that a mini bi-pin (G4) lamp holder is a perfect fit inside them. So really just two steps to that part -- drill a hole, and glue the holder in place. Next time I have the fairing open I can try to get a pic of the wiring.


Quote
Also, would some LEDs in the stock (US) turn pods also be a benefit? Would need an adapter to deal with fast blinking, but...

I think the drop-in replacement LEDs nowadays are much better than stock lamps, especially on scooters. The incandescent scooter bulbs are all lower-power versions of automotive bulbs due to the anemic alternators on these motors. By going to LED you can get a lot more light output and actually reduce the power budget.

I have not cross-referenced those bulbs so I am not sure which LEDs you need but I am sure they're out there. The flasher is a big question mark; if it's electronic it will probably be fine but the old standard thermal ones depend on a certain load which the LEDs can't supply. There are aftermarket LED-compatible flashers, too, but I don't know how much effort it would be to retrofit. I might look into it because I would like to change the rear blinkers out for brighter LEDs, too.


13
LIKE 200i / Aux turn signals in the stock housings
« on: February 13, 2019, 09:27:52 PM »
Greetings all. New member but long-time lurker here, riding Kymco scooters for a dozen years.

I thought some might be interested in my take on adding some very bright LEDs to the stock front turn signal housings for increased visibility and safety. This is now the second Like 200i that I have outfitted this way so I decided to document the process this time, along with LED replacements for the front position lamps.

I started by removing the blanking covers from the back of the housings. That involves opening the access doors on both sides of the glovebox, twisting each blank cover about 1/6 of a turn CCW and pulling it out. To remove it completely you will need to unscrew the small screw and P-clamp that secure the covers to the wiring for the front position lights. Discard the screw and P-clamp; they are unnecessarily and I believe they are there only to keep the blanking covers from being lost.  Note that the blanking covers have gaskets; make sure these stay on the covers.

Next I drilled about a 1/8" hole in the center of each blank. I "wallered" the holes out in one direction, making them somewhat elliptical; this because the pair of wires fits better in an oval than a circle.

To hold the lamp I used a ceramic mini bi-pin lamp holder. These are commonly found in low-voltage halogen fixtures and are readily available as replacement parts. Because I live on a boat I have a bag of them, but you can buy them individually or in small lots of five or so on Amazon or eBay; just search on "mini bi-pin base." What you are looking for will be clear from the next photo. I like the ones that are all-ceramic except for the contacts; many on the market have a metal shield on the lamp end. They all come with a short wire pigtail.


Thread the pigtail through the hole you just drilled. Test the fit; the lamp base should be a tight press-fit in the blanking cover. Pull it back out to expose the back, and apply a dollop of butyl tape or silicone adhesive. You want enough to "glue" the lampholder in place and to seal the hole around the wires, but not so much that it squeezes out through the contact wells where it can interfere with the pins of the bulb. I like butyl tape because it's easier to get the quantity right and you can continue to work the piece until you're happy, plus there is no cure time. Press the lampholder well into the blanking cover; you want a press-fit in addition to the glue.


Bring your right and left turn signal wires down from either the existing signals or the main harness. It all depends on which pieces of the fairing you are more comfortable removing. I split the front and back of the main leg shield apart and spliced into the main harness just downstream of the 9-pin connector for all the stuff in the dash area, using 3M Scotchlok T-Taps, the blue size. Left turn wire is Orange, right turn wire is Sky Blue. Run a bit of wire from each down to the respective lamp housing, leaving a little slack to make your connections. I use disconnects for the connection between the pigtails and the signal wires to make it easier to remove if needed later. I tied the other side of each pigtail to the handy ground wire for the position lamps, again using Scotchlok T-Taps.

For the lamp itself I chose a fully silicone-encapsulated all-around LED. I have a quarter in the photo for size. These happen to be 1.5w "warm white" lamps with a G4 base, which is what you need for these sockets. I paid $9 for six of them on Amazon. Fully insert a lamp in each base, and re-install the blanking covers.


Note the covers only go in to the holders in one orientation, and it's easy to over-rotate it CW past the stop, which is just a little plastic tang, breaking it off. Study the bayonet arrangement carefully and take care not to over-torque the holder on insertion.

Test the turn signals, button everything up, and you're done!  These lights really pop; much brighter and more noticeable than the factory stalk-mounted signals, which you may now be tempted to remove (I'm not sure what that would do to the flash rate). I kept the stock signals; can't overdo it when it comes to visibility.

Speaking of which, bonus project: While I was at it, I replaced the stock 5w incandescent wedge-base bulbs in the lower parts of those housings, the "position" lamps, with LED units that, again, are much brighter and more noticeable. As a bonus they use less power from your electrical system. Here I went with drop-in replacements that are fully encapsulated in clear plastic.


The magic search term here is T10 wedge-base. Available for a few bucks on Amazon or eBay. If you are daring they are available in other colors besides white. You want ones with an LED on top as well as around all sides.


Access the lamp holders by turning the front wheel to one side and reaching up from above the fender; the lampholder just pulls straight out. While you have the access covers off inside the glove box you can now pull it up by the wire to change the lamp. The trick is getting it back in; it's a press fit until the rubber squeezes into the hole enough to engage the groove. A bit of silicone lubricant or dishwashing liquid on the tapered end helps this process.

Enjoy!


Pages: [1]